


We tell you how to choose a sink and a washing machine so that they can be combined, and how to install it correctly.
Bathrooms are small in size in most apartments. With all the desire to put everything you need in them is very difficult. The owner has to save every square centimeter of space by coming up with non-standard approaches. One of them is installing a sink above the washing machine. Let’s figure out how to do it right.
Why is the washer placed under the sink?
As you know, ideal solutions do not exist. And this is no exception to the rule: there are both advantages and disadvantages. Let’s talk about the first one first.
The advantage of such a solution
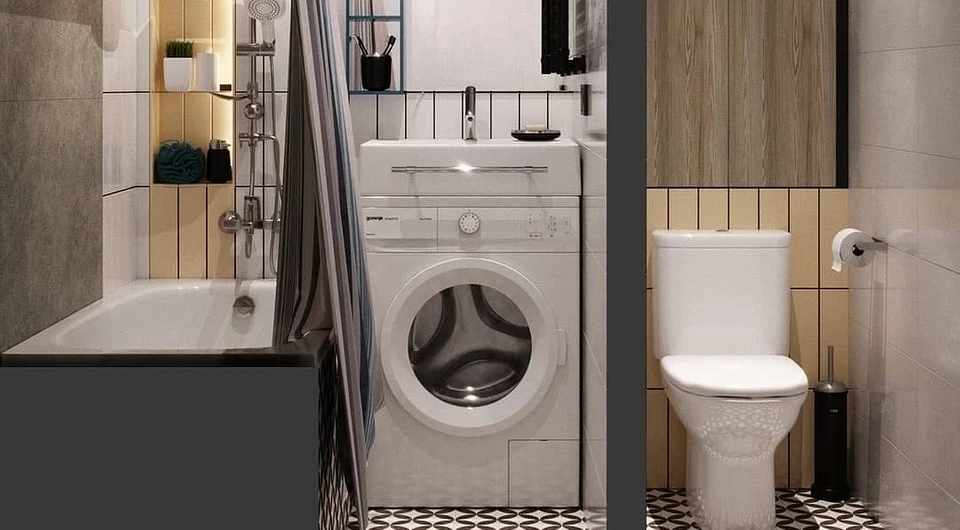
A definite plus is the most efficient organization of space, which allows you to use the lower and middle tiers. If you additionally place shelves or a cabinet above the bowl, the entire wall will “work”, which is very important for small rooms.
Flaws
The main disadvantage is the lack of electrical safety. The plumbing fixture is located above the equipment, which means that if water flows, it will enter the machine. This will cause a circuit, provoke damage to equipment, and other unpleasant consequences.
Therefore, it is necessary to consider how to install the sink above the washing machine in the safest possible way.
The type of sink matters. The standard design with a drain in the central part can theoretically be installed, but its use is potentially dangerous. Therefore, it is optimal to install special plumbing. This is a flat sink with a drain in the corner, which is called a water lily. True, it is not so convenient to use it, but it is safe for an electrical appliance.
There is one more option. Buy a bowl with a countertop, under which to put the washer. This eliminates damage to the electrical appliance, but the structure takes up more space. It is necessary to pay attention to the overall height of the structure. It should be such that it is convenient to use the plumbing system. Most likely, you will have to buy super-compact household appliances or models that are equipped with a specially selected sink. They meet in stores.
Another small downside. When washing, it is impossible to get close to the structure, since there is no free space under it. You have to get used to this.


What equipment to choose
Let’s start with the sink for installation above the washing machine.
Suitable sink
Given the rules of electrical safety, flat designs are chosen. They are not the same type, there are two variations that differ in the type of plum.
Shell varieties
- Horizontal type. The siphon is placed at the minimum possible distance from the wall. It is assumed that in this case, the drains in a certain section of the sewer will drain in a horizontal position, which greatly increases the likelihood of blockages. But the siphon assembly is located so that even with a significant leakage, the liquid does not enter the electrical equipment.
- Vertical type. A flat siphon is placed under the drain, that is, above the machine body. Therefore, in the event of an emergency, the risk of damage to household appliances remains. At the same time, the outflow of liquid is much better than that of horizontal analogs. The likelihood of blockages is much lower.
In addition, water lilies differ in the place where the mixer is attached. This can be the central or lateral section of the bowl rim, it can be mounted on the wall. Models can be equipped with shelves for soap, overflow unit,s and similar useful accessories. Their sizes and colors vary.
Washing machine selection
In theory, this can be almost any device. However, it should be such that it is convenient to use the washbasin located above. This means that the maximum depth of the device should be about 35-40 cm because it is impossible to move the case tightly against the wall, you must also bring communications to it. If the machine is higher than 60 cm, the plumbing will rise above the 85 cm mark, and this is already inconvenient. Especially if there are children or elderly people in the house.
Therefore, you will have to choose only a compact or super-compact model. They are often limited in capacity. It is rarely more than 3.5 kg of laundry prepared for washing. The best choice is “tandems” for the washing unit and plumbing. These are produced by most major manufacturers. Both devices are designed for common work, all safety requirements are met. There are models with protective doors that cover the pediment of the machine from splashes.
If, nevertheless, the equipment is bought separately, it is important to pay attention to a few more points. The control unit must be only frontal. Otherwise, it will certainly be flooded with water when using a sink, this can disable the washer. The edge of the bowl should protrude at least 200-500 mm in front of the body. This will make it possible to protect the front of the machine from splashes.
Thus, the minimum width of the sink must be at least 58 cm, provided that the sewer outlet is located behind the rear panel of the cabinet. If the outlet is located to the side, then it decreases to 55 cm. Before buying, you need to determine how the drain hoses will be placed. During installation, it is forbidden to lay them out on the electrical equipment case.


Step-by-step installation of the sink above the washing machine
First, check the complete set of plumbing. It is hinged, so brackets are required. These are the two parts on which the sink is installed. It is best if it comes with them, since the configuration of the brackets may differ for different models. If they are not, you need to buy them in the store. In addition, if there is no siphon among the accessories, you also need to buy it. After that, proceed to the installation. Let’s break it down step by step.
1. Markup
To install a sink above a washing machine in the bathroom, you need to start with markings. First, draw a line that will mark the top edge of the washer. This will be the main guideline. From it will go further markup. We outline the line of the upper edge of the bowl. At the same time, we take into account that there must be a gap between the plumbing device and the electrical equipment case. You need to make sure that there is enough space for the siphon of the selected type. After that, a straight line is drawn on the wall. The level controls the horizontal. A sink is attached to the basting. If it has mounting holes, they are circled with a pencil. There are areas for drilling for fasteners. Once again, it is checked how convenient it will be to use plumbing. An important point. Sometimes a gander mixer is used alternately for a wash bowl and a bathtub. Then you need to make sure that the length of its spout is sufficient for normal operation.


2. Mounting the bowl
Installation begins with making holes for fasteners. To do this, in the intended places, cavities are drilled for dowels, then a plastic part is inserted into them. Sometimes before this, the holes are additionally filled with glue so that the fasteners are better held. Then fasteners are inserted, but not completely twisted. Only slightly “baited”. After that, brackets are put on the dowels. The bolts are still tightened, but not fully tightened. Leave gaps of at least 6-7 mm. This is necessary for the plumbing to properly “sat down” in place.
The next step is sealing the future joint between the wall and the plumbing structure. A bead of silicone sealant is applied to the edge of the rear edge. If the fasteners touch the sink, do the same. Hang the sink on the brackets. Sometimes a special hook comes with plumbing, which helps to fix it to the wall. It must be inserted into a small hole, it is located on the back of the sink. After the hook is inserted, with its help the sink is fixed, and the resulting connection is fixed with a self-tapping screw. It remains to tighten the fasteners-dowels on which the brackets are fixed.


3. Connecting the siphon assembly
For some models, it is more convenient to do this with loose brackets, which must be taken into account before work. Start by assembling the siphon assembly. You can do it yourself. There is nothing complicated, but strict adherence to the requirements of the instructions from the manufacturer is mandatory. During assembly, all seals and threaded connections are coated with silicone sealant. This guarantees the tightest possible fit.
Plastic knots are handled carefully, without much effort. They are easy enough to break. When the siphon assembly is assembled, it is connected to the nearest sewer outlet. An important point. If the mixer is supposed to be installed on the shelf of the sink, it is mounted in place. Flexible hoses are connected to the appropriate water pipes. The wall faucet can be installed later.
4. Connecting the washing machine
They begin installing the washing machine under the sink in the bathroom by connecting it to communications. The drain tube from the device is inserted into a special pipe on the siphon or on the drain. It is securely fixed, most often they use a clamp and screw tightening. If there is excess corrugation, bend it into the shape of a knee and fix it with electrical tape or plastic wire. The design will work as a second water seal. Due to the design features of the water lily bowl, its water seal often breaks down, so an additional one will not hurt.
The water supply pipe is connected to a cold water supply through a special pipe. After connecting, the device is installed in place. Screw-type legs adjust the position of the body, using the level to achieve an accurate horizontal. This will give the device the necessary stability.
It remains to turn on the device in the network, and you can carry out tests. An important point. Electrical equipment in the bathroom must only be connected to an earthed circuit. It is advisable to use only a special socket with moisture protection and install an RCD for the machine in order to eliminate possible emergencies.


The most important thing about our X that it is for
those who are in a hurry


