


Perhaps one of the surest ways to painlessly move a child to his crib and generally turn bedding into his favorite ritual is to arrange a “sleepy” corner in an unusual and cozy way. We will show you how to quickly and easily make a place for your baby to relax.

Saving is a weighty argument to make a children’s bed-house with your own hands, because the difference in price between the finished product in carpentry workshops and the cost of materials can be huge.


It depends, of course, on the design and its “tricks”, but, knowing the basics, you can build a model of any complexity.
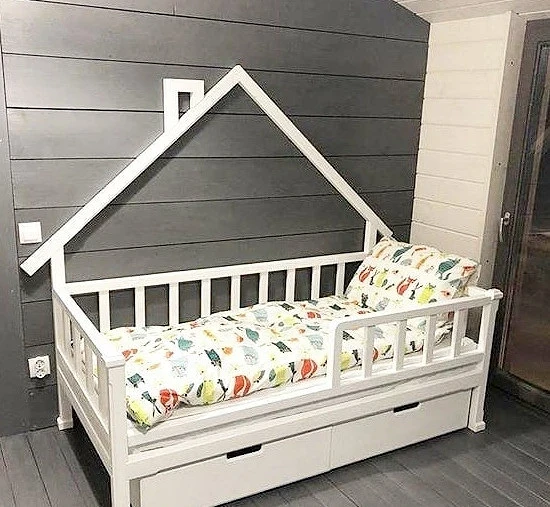
The simplest and most common option is a “frame” house in the form of a light frame with a schematic designation of the roof and walls. However, the product can look like anything, but the base for it will be just that. From it can turn out both laconic small wigwams and large two-story “buildings”.


Do-it-yourself children’s bed-house: drawings and options
Before starting work, it is important to prepare a sketch. Thanks to it, you can compare the parameters of the product and the room, adjust them, as well as calculate the length and width of the mattress, bed linen, and bedspreads and pick up / order all this in advance.
In addition, the drawn diagram will help you decide what the end result will be. Do you (or your child) want an open, closed house?


How many seats does it fit? Will it be single or double-tier? If this is a loft bed, then what is planned below – a second bed or an area for playing, or studying?


There are floor houses – for very young children so that they do not fall. The slatted bottom is literally a couple of centimeters from the floor.


And there are taller designs – with legs or storage boxes. The latter saves a lot of space in the room (no need for a chest of drawers), but they also need to be provided in advance. Boxes are made on rails or on wheels. To guarantee the preservation of the floor, it is better to choose rails.


Sometimes there is also a completely minimalistic option, when the roof frame is located along one sidewall, against the wall.

A do-it-yourself bed-house for children can be of any size. But for reference, a cheat sheet from the masters.
They identify the three most popular standard sizes: 160/70 cm, 160/80 cm, and 190/80 cm. The first two are suitable for children up to eight, a maximum of ten years. And the third is acceptable for teenagers. If you want to equip a recreation area for many years to come, then it is better to choose a length of 190 cm.
True, if you now need to save space in the nursery, or you and your child want to update the furniture in the near future, choose a more compact model.


Materials and tools for work
You will need:
- smooth, without cracks and knots, bars with a section of 50X50 made of beech, pine, alder, cherry or other species,
- self-tapping screws and/or dowels – wooden round spikes (how exactly to fasten the parts depends on your desire),
- metal corners for self-tapping screws,
- Sander,
- sandpaper,
- drill with drills,
- hammer,
- miter box (template tool for cutting corners),
- hacksaw,
- metal square,
- a clamp or a strong belt for fixing the bars, if you connect them with dowels,
- wood glue,
- screwdriver,
- roulette,
- pencil.


Wooden beams can be purchased at hardware stores or building supermarkets. As a rule, raw materials require careful grinding so that children do not get hurt or drive a splinter. In a residential apartment, it is not worth bringing wood to perfect smoothness – there will be no salvation from the smallest dust anywhere.
How to build a bed in the form of a house
Work on the floor or on a large table, it’s more convenient, and the design will be smoother.
First, mark the bars and cut them into blanks in accordance with the selected dimensions.


You can immediately cut the corners with a miter box. It is especially important to prepare 45-degree cuts for the vertical posts that will be at the four corners of the bed. Treat all notches with sandpaper.

Mounting on dowels
Mark the connections and drill holes. They should be located one above the other or diagonally. Fix each joint with at least two dowels. They are put on special glue and compressed with a carpentry clamp.


Strong belts, for example, towing straps, are suitable from improvised materials. But they will take longer to deal with.

Assemble each wall of the building separately: first glue the rectangular frame and the gable roof with a chimney, then connect them to each other.


Reinforce the sidewalls with crossbeams, especially if your building has two floors. These bars are also put on glue and dowels/screws.


In carpentry workshops, several clamps are used at once to speed up the process, but if you do not have so many tools and take time, you can get by with one.
Similarly, the stairs and sides are assembled.


Two frames, standing at the end of the “building”, need to be interconnected with bars that are slightly longer than the future mattress. Here you can’t do without a drill. Mark and drill holes for the screws in advance, preferably using a vise.


Screw fasteners slowly, otherwise the wood may crack. The resulting bed can be easily disassembled into parts for transportation or rearrangement.
The product does not loosen after drying. According to experts, the presented assembly method is the most durable and aesthetic of all existing ones.
Self-tapping mounting
They are good if you need a fully collapsible bed or you want to simplify your task.
Corner brackets are needed to give strength to all 90°C joints, and glue must be poured into all holes.
Take two bars equal to the length of the bed, and one more – its height to the “ceiling”. Pre-drill them in the right places. Connect all three parts. Using a drill, first, attach one side rail to a standing post, then the second. The screws must not cross.

So successively fasten all eight horizontal strips above and below (four in width and the same in length) with four vertical ones. Make sure that the internal angles are equal to 90 ° C, and then the external ones will be located exactly, on the same line.

When you finish the frame, add the diagonal parts of the “roof” on top. Take two bars of the same length, one end of each of them should already be cut with a hacksaw at an angle of 45 ° C. Together with the “ceiling” you should get an isosceles triangle.

Fasten the sides of the triangle and drill them to the base. Do the same with the other end of the house.
The ridge of the roof can serve as a beam, similar in size to the length of the bed.


The bed is sometimes made transformable according to the age of the child. And then, upon reaching adolescence, the side, roof, and window (if any) can be removed. The bed will become more “adult”, which means it will last as long as possible. If you like this option, definitely put these parts on self-tapping screws.


How to make a house bed closed
To add maximum comfort to the resulting corner, the facade can be sheathed with boards, after having also sanded them.

The material is secured with furniture bolts, usually closing the caps with plugs to match the color of the furniture, but sometimes left as is.


Instead of boards, lining is also suitable, especially since it has already been processed. Furniture boards have also proven themselves well. It is convenient to cut windows out of them: you do not need to adjust the planks in length.


The back wall is made of plywood about 12 mm thick. If you stick wallpaper on it, the child will get a real apartment!
Since the weight of a closed structure is much higher than that of a frame structure, you definitely cannot avoid reinforcing the frame with metal corners.


The final stage of work
Make a rack bottom. To two long strips with a step of several centimeters, screw the transverse ones – short and flat. Special lamellas from a hardware store are also perfect.

In this version, the bottom is inserted into the bed frame and removed from it, but you can attach them directly to the outer frame.
When finished with the assembly, go through the entire product with a grinder. This is not necessary in order to remove the knots, because, in theory, you got rid of them even before starting work. Sanding will help hide bad joints.

Treat the wood with oil or wax in about three coats. Choose eco-friendly flooring suitable for children’s rooms.
Bed Decor Ideas
Finally, you can let your imagination run wild.
A blank roof from the inside is sometimes pasted over with slate paper or painted with slate so that the baby can decorate his “home” with any drawings according to his mood.

Curtains can be sewn onto windows and doors, especially if the room is on the sunny side. In any case, during daytime sleep, they will not be superfluous.


It is beautiful when the decoration of the recreation area echoes or even continues the idea of decorating the entire bedroom.


Here is an idea for a nautical-style house:

And you can make a rural house in the style of Provence:


A beautiful canopy on top is a great decoration for the house. It can be a solid pastel color, airy organza, or even a small flower.


Sometimes the very minimum of decorations is enough: a Christmas tree garland as a night light and several pillows of different shapes and colors.


The garland may not be from a Christmas tree. Chinese lanterns look stylish even when turned off. They are often supplemented with colorful fabric flags hung along one of the sidewalls. Perhaps you can buy beautiful bedding that will become a self-sufficient accent and will not need support.


The most important thing about our X that it is for
those who are in a hurry


